Do you have a hard time picking colours to use for your pages?
That’s something people often say to me; they just don’t know how to pick colours.
The advice I usually give is three-fold:
- Think about the season or occasion.
You might want to choose colours that convey that feeling. You wouldn’t want to use bright red and green at Easter, right? And you’re not likely to use orange and brown for beach photos. Or black for baby pictures. - Look at the colours in the photos.
There might be an accent colour you can pick up on. Or maybe you have a pattern that is almost the same as someone’s shirt pattern. If everyone’s wearing similar colours, choose papers in that colour family. - Go with your gut instinct.
What was your first thought? Maybe something jumped out at you. Or you had a paper in mind when you thought about doing a particular page. Go ahead and use it. There really aren’t any “paper police” who will get you for using the “wrong” paper. Use what you want.
Here’s a look at the February layout challenge sketch.
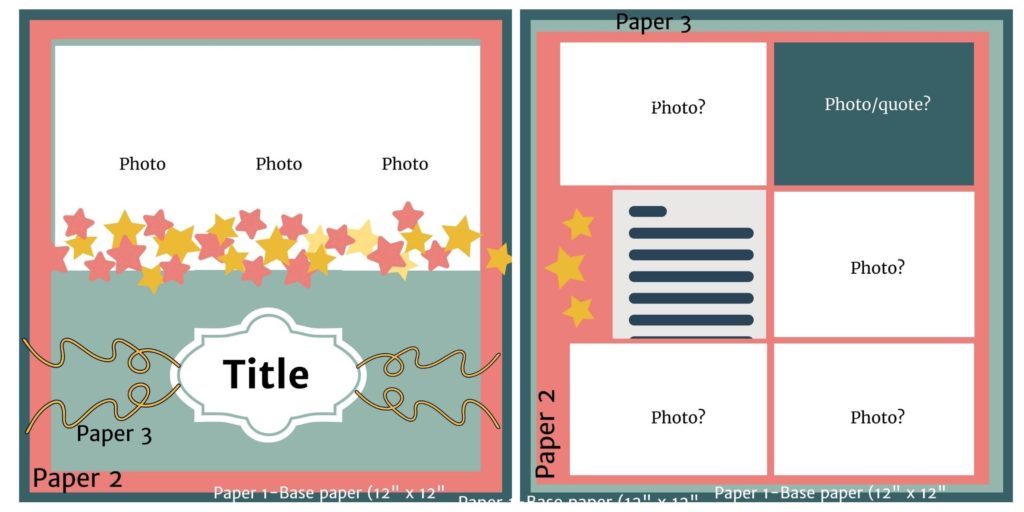
(Note: these rules are not really enforced. The prompts are only meant to inspire you so if you don’t fill them all on a page, don’t worry about it! Just be inspired to create a layout, then share it!)
And that brings me to how I chose the papers I’ve used for my February Challenge pages.
I’d actually posted a couple of cardstock choices on The Scrapbook Room Facebook page recently, asking which pairing everyone preferred.

(Click HERE if you want to go and state your choices too!)
For my layout, I decided I would use the two cardstock colours on the left. The other two colours were a little loud for February, I thought. Or at least too loud for the photos I had in mind. After all, red = Valentine’s and that yellow could be interpreted as gold. Still, not the colours I needed this month.
After I started cutting my cardstock, I realized I’d used similar colours in my January layout.
Oh well, perhaps it will be a theme colour throughout the album.
Have you ever done that? Found a way to tie a whole album together? It’s particularly good to do on a smaller album that has a definite end.
And I know this album will have exactly 12 layouts and will end in December. So I’ve decided the teal will continue throughout.
I haven’t done the album cover yet (I know! I promised that LAST month!) but I think I could incorporate the teal colour on there too. The reason I hadn’t completed the cover was because I wasn’t sure of what colours to use.
But now I’ve decided. Definitely teal!
Other ways to tie an album together are to use the same font for the title in every layout, use the same border or pattern paper somewhere on every page or even follow the exact same layout design for every page.
What other ways can you think of to tie your pages together?
Starting my pages
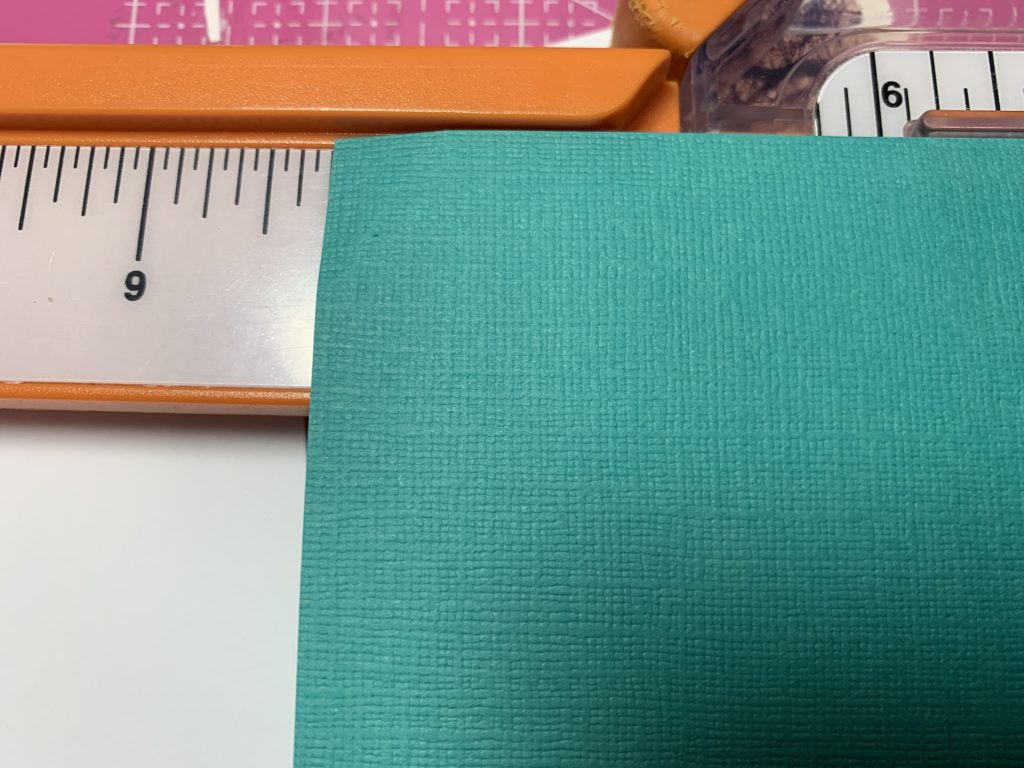
I trimmed my cardstock bases for both pages to 8.25″ x 8.25″. One is the Caribbean Sea colour, the other is the Mandarin colour. These papers are from My Colors Cardstock and they are the ones you’ll find in my online store.
These cuts will allow me a nice bit of white border around the edges of both pages.
Do you know how to use your paper trimmer correctly?
In the photo above, I’ve set my paper to the 8-1/2″ mark. I’ve made sure the arm is pulled up, nice and straight. When I cut, I press gently but firmly on the guide ruler. Don’t press too hard or you’ll get a wobbly line!
If you don’t know how to use your trimmer correctly, let me know. Being able to cut your papers straight can make all the difference in your projects.
Because my book surface feels a bit uneven, I’ll work on my pages first and then attach them to the album. If I were working in a 12″ x 12″ album, I’d do the pages first and then insert them!
I’m not using any pattern papers today. The two cardstock colours will suffice.
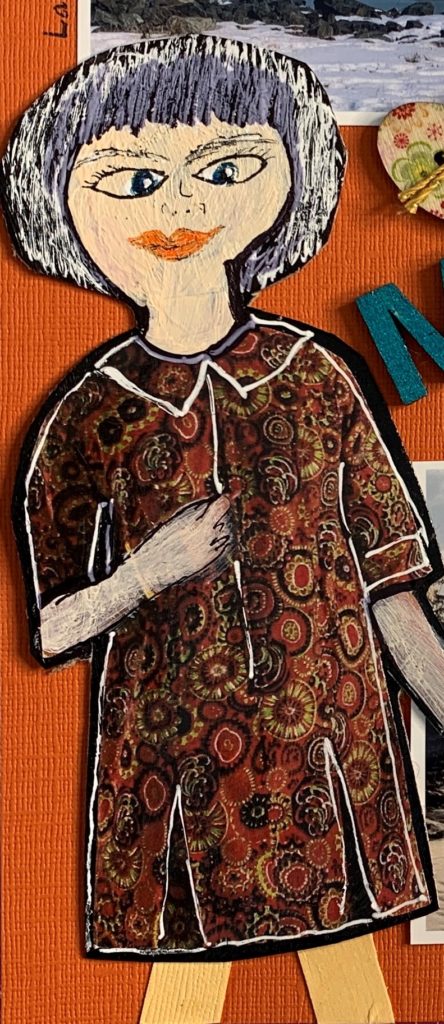
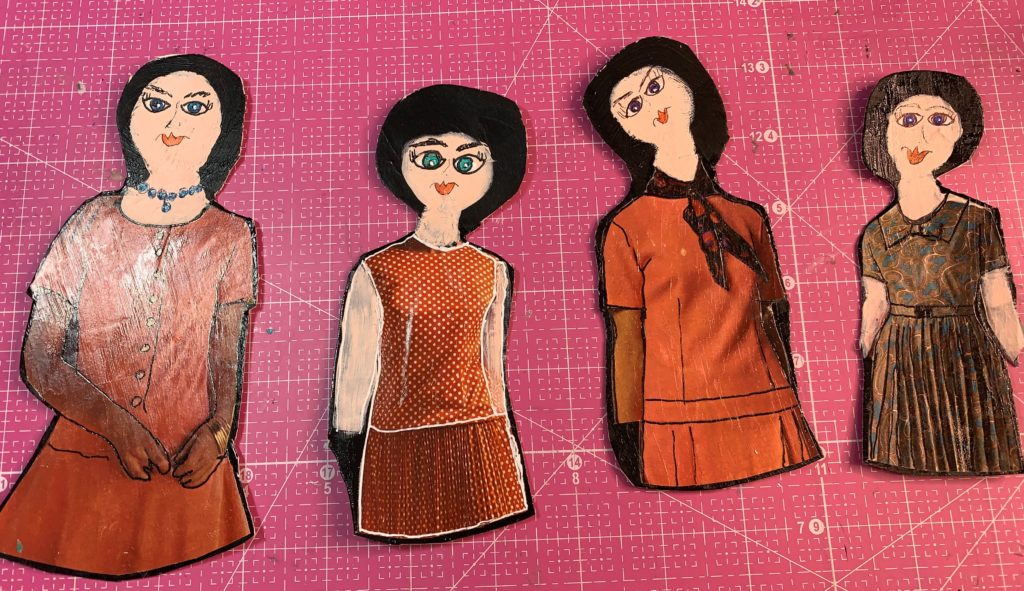
On the left page, I’m going to include one of the paper dolls I made recently.
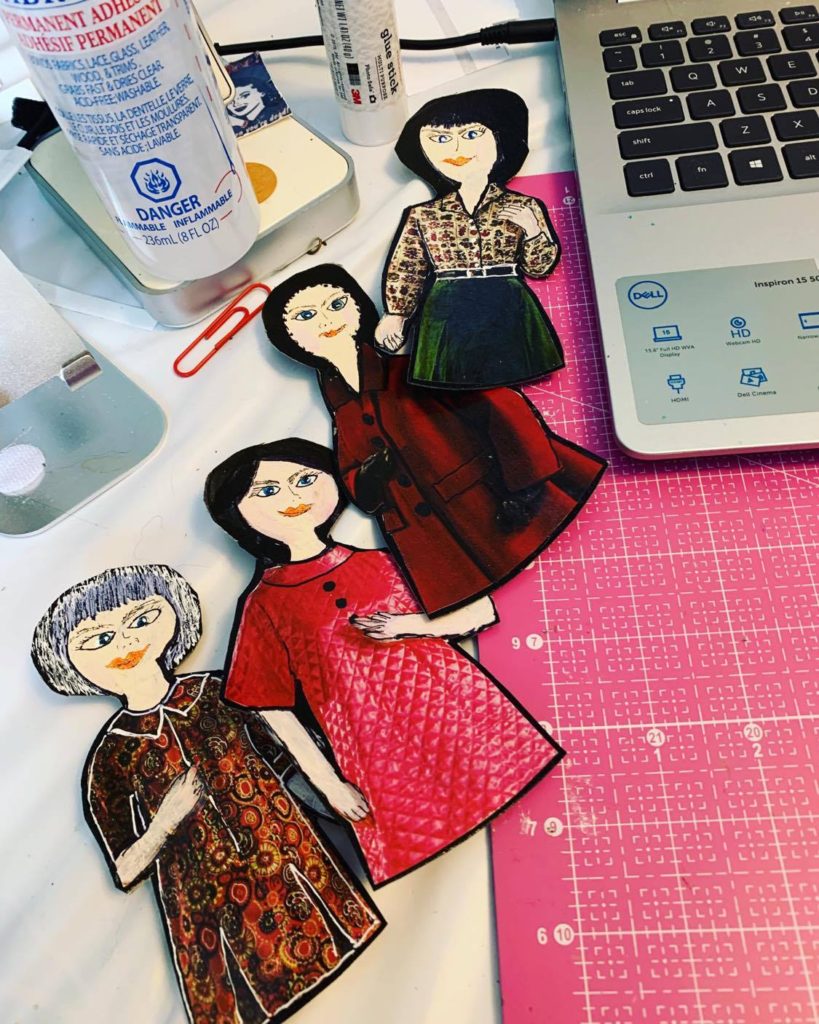
I learned to make these dolls in an online mixed media course. The course was only $10 and the dolls seemed whimsical and easy enough to do.
And now I am in love with these little creatures. I even asked on Facebook for old catalogues so that I could find more clothes for my dolls and my neighbour brought me THREE–all from the 1970’s.
They are so adorable. (The catalogues, I mean!)
I thought perhaps I shouldn’t cut them up but what the heck. I’ll try scan some of the pages before I cut. And how many dolls can I make? I’m sure I’ll run out of steam long before I run out of catalogue images.
This particular doll I’ve added to my layout is meant to represent me though I didn’t intend to make her be me when I started creating her.
But I wanted this page to be about me…just being. She’d already had white added to her hair.
She was perfect to be me…being.
And what am I being? Photographer. Backyard enthusiast. Grandma. Scrapbooker.
Those are the things that have encompassed my February so that’s what I’m documenting.
Missed the January Challenge sketch? You can read about it here.
We’ve been on lockdown in Ontario and I’ve been starting to feel confined. I’m jsut grateful I’ve at least had these things you see in my photos to bring joy to my life.
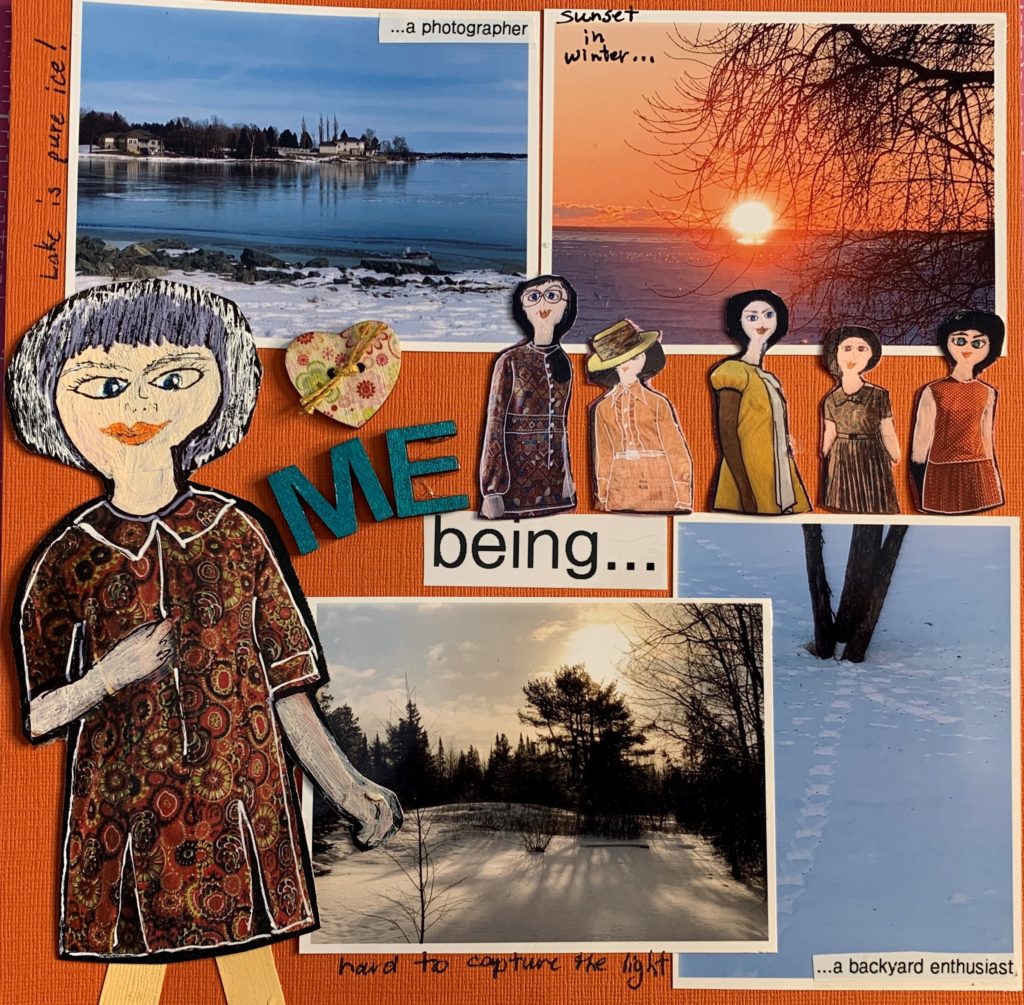
I almost wanted to cut the white borders off my photos on this page but I ended up simply trimming to make them quite a bit narrower. The white pen lines on the paper doll tie in nicely with the thin borders so I’m glad I left them.
I didn’t have enough room on the layout for a photo of the dolls so I solved that problem by cutting the images out instead.
I saw how cute they looked so I decided to make some more so that I could take a photo, cut those ones out as well and use them for the banner on the first page.
Those first ones I cut out fit quite nicely into the space at the bottom right of my second page.
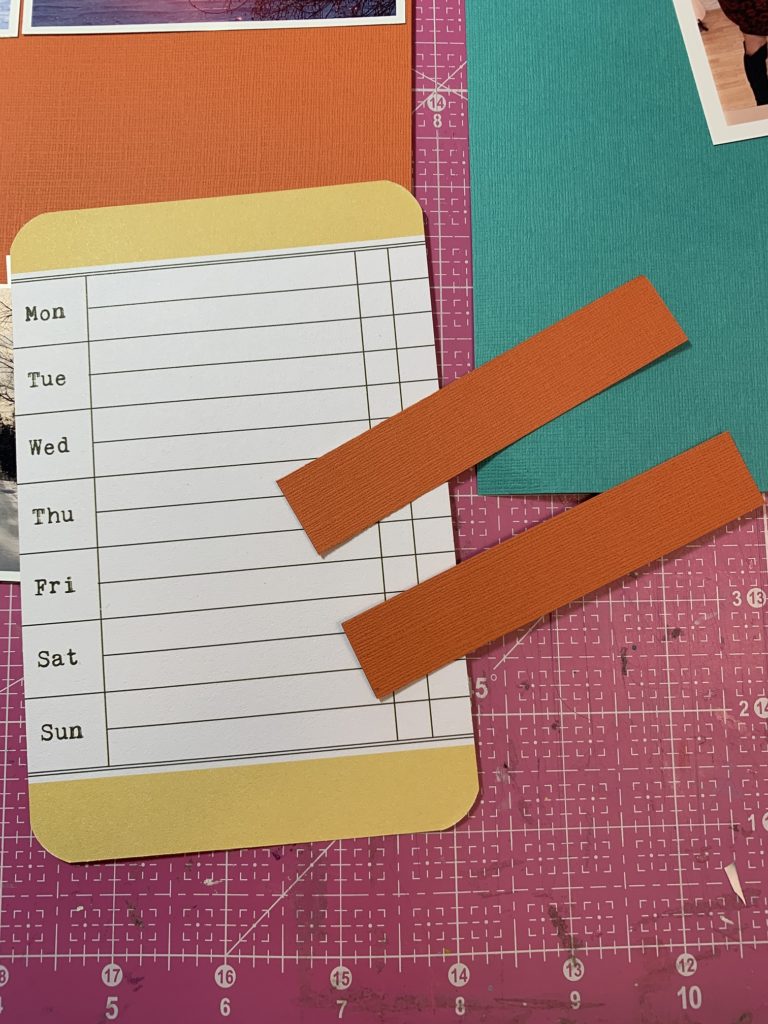
Also on the right, I wanted to use this 4″ x 6″ Project Life journalling card. I wasn’t keen on the yellow at the top and bottom of the card so I simply covered it with strips of orange cardstock. I debated covering or cutting the days of the week off the card but decided to leave them intact.
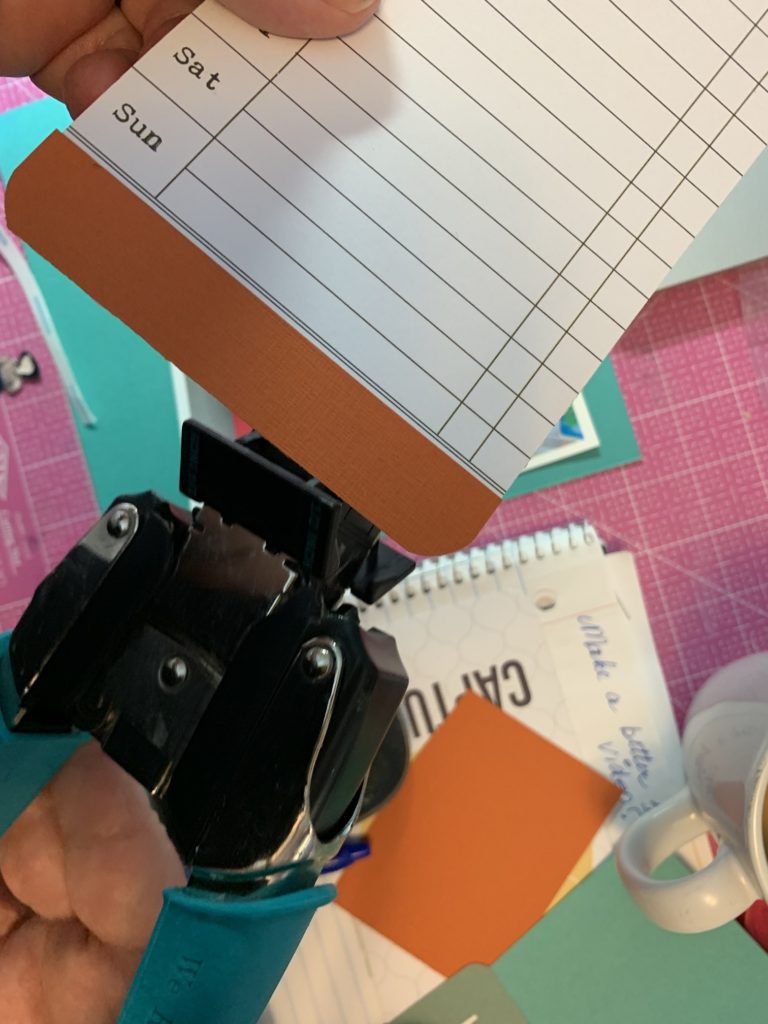
These photos were taken on random days so leaving those “days” on the journaling card help tell that part of the story.
I don’t particularly like that my borders don’t have the same spacing on the two pages but I needed the extra space in the middle on the left and didn’t want to be too crammed on the right. So it stays. Do you notice it?
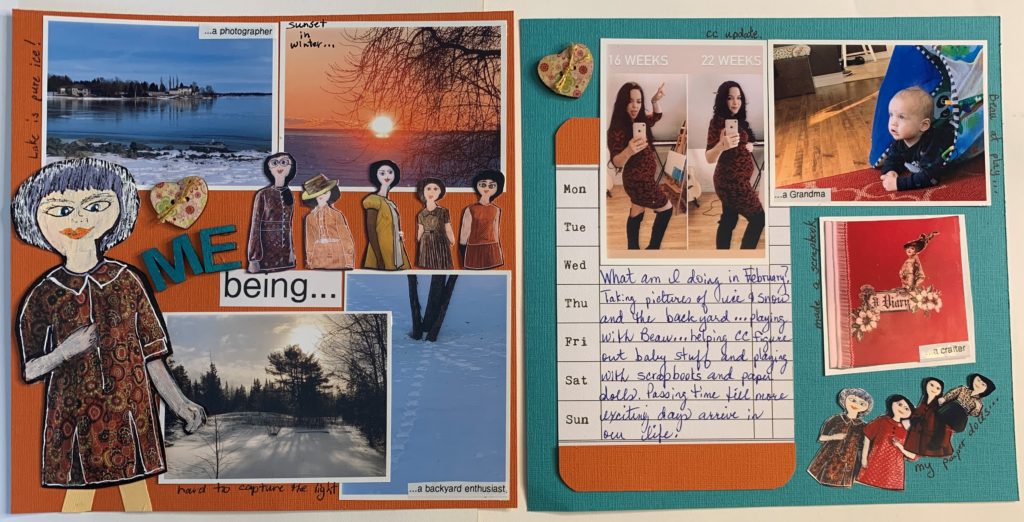
That’s the completed layout above.
I coloured my wooden letters for “ME” with my stencil butter from The Crafter’s Workshop. I love how that stuff goes on. It truly is like butter.
This is a new product that I was able to get an advance sample of but it’s not yet available to purchase.
I participated in a class where we made this mixed media project with the butters. I’d love to offer the class to you when the product becomes available. Let me know if you’re interested.
No experience is needed to make this project!
And the product really is like butter. So smooth. And it’s shimmery too.
But back to my page; I came across the two chipboard hearts in my stash. The colours match the whimsical colours of my paper doll clothes and it IS February so adding a couple of hearts is perfectly in line.
I didn’t want the page title to read as “LOVE…ME being”. I hoped that adding more dolls to create the border would help avoid that. After I created more dolls, I took a picture, printed it, and cut out the doll images to create my border.
I love them.
So cute. Such a fun little project to make.
Sure, these dolls are one of those artsy projects that serve no real purpose but I’m thinking about ways I can utilize them in the future. Like maybe I’ll add them to cards.
I need an excuse to make more so if you’ve got any ideas, share them with me. OK?
And seriously, making those dolls is a super-fun, relaxing, and meditative thing to d0. Add in the fact that they look so darned cute. Maybe that IS reason enough? What more excuses do I need?
Do you agree?
As you may have noticed, my layout doesn’t fulfill all the specs I set out in the challenge.
For starters, I didn’t use three different papers. I only used two.
And I don’t have six blocks on my second page. Hopefully, that shows you that a challenge sketch is only meant to challenge you. If you CREATE, I’m happy! And you should be too.
A few final tips
Here’s some other tips I hope you learned from this challenge:
- You don’t always need a whole bunch of fancy papers to do a page.
- All you need is cardstock and you can do anything!
- You can use bits of whatever is in your life to embellish your page whether it’s a piece of art (my dolls) or a food wrapper or a piece of lace off a dress. And how about a seed packet? Or postage stamps off a letter?
- Being consistent can help bring unison to pages. Trim page borders to the same size. If you’re only matting one photo and leaving the rest plain, you can still find a way to tie them together. Something as simple as the shape can help tie items together.
- Even when pages are different colours, add a couple of items to unite them. For example, add buttons or other embellishments.
And my final bit of advice; do what you want on your pages. If YOU like them, that’s all that matters. It’s YOUR project so just have fun.
By the way, you have a few more days to get your February layout uploaded to The Scrapbook PLAYroom. Do that and you’ll get a chance to win the random drawing for $10 to spend at The Scrapbook Room store.
And watch for the March challenge coming next week!
Want to keep up to date on everything The Scrapbook Room is up to? Subscribe to my email list. You’ll get FREE instructions to make a mini album at the same time!